REQUEST In progress
A MacBook for the finance team
T-00010Approval history kept
Manage IT requests, approvals and equipment in one place.
Configure the process to match your company’s policies.
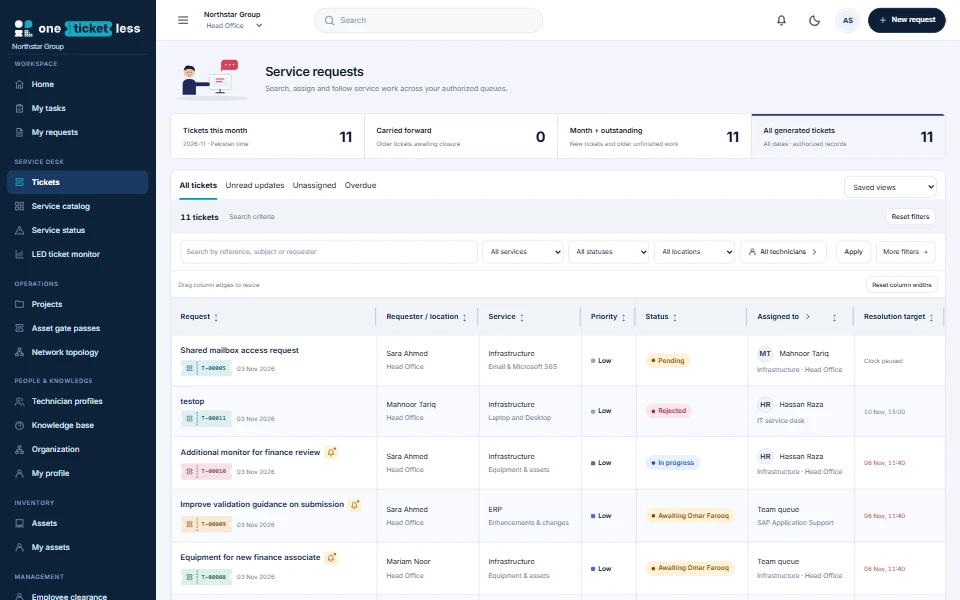
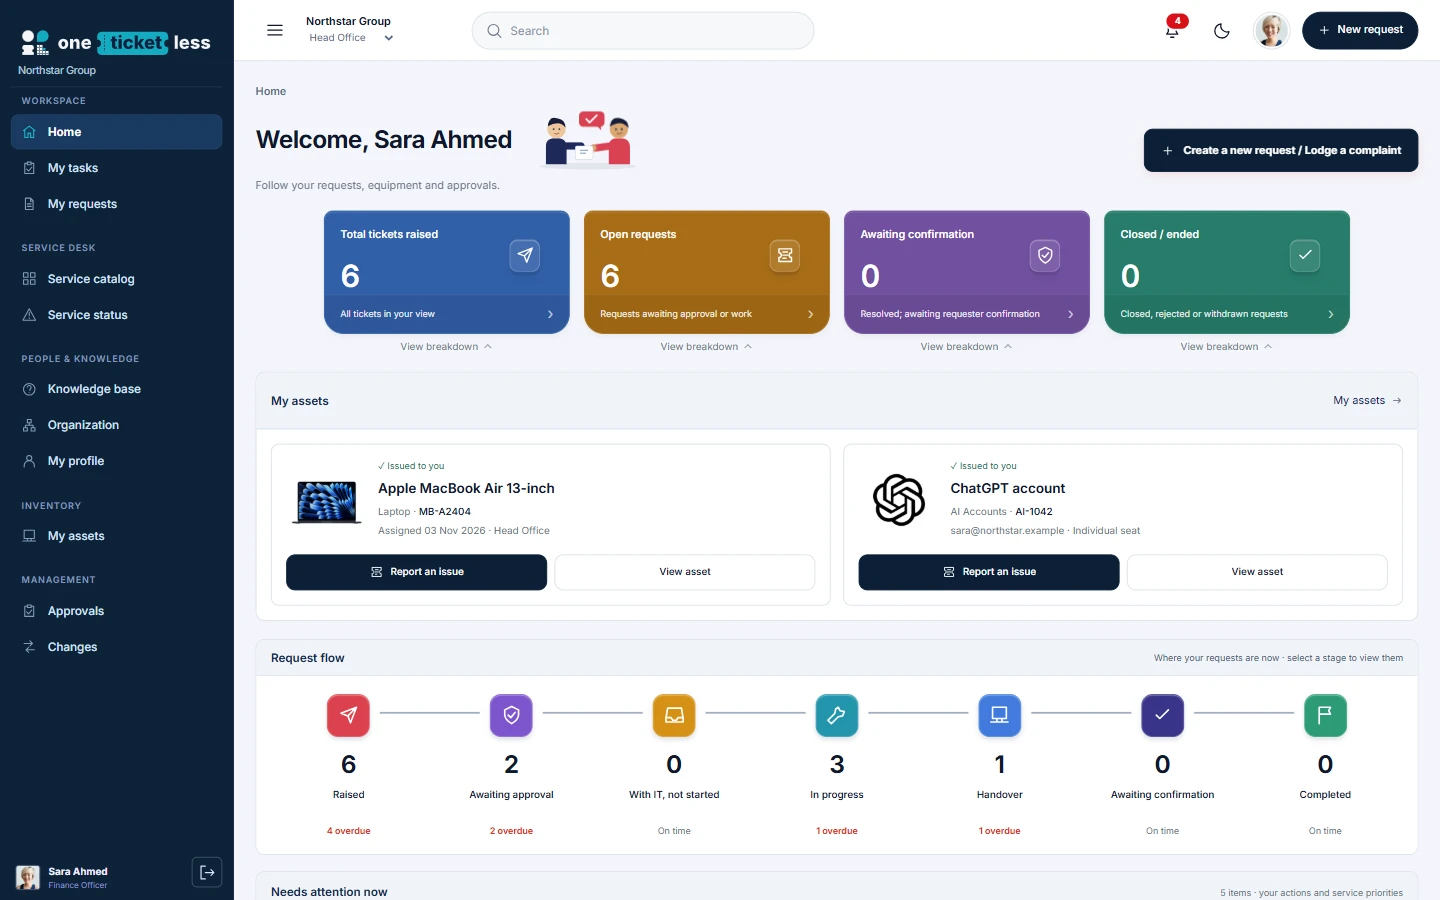
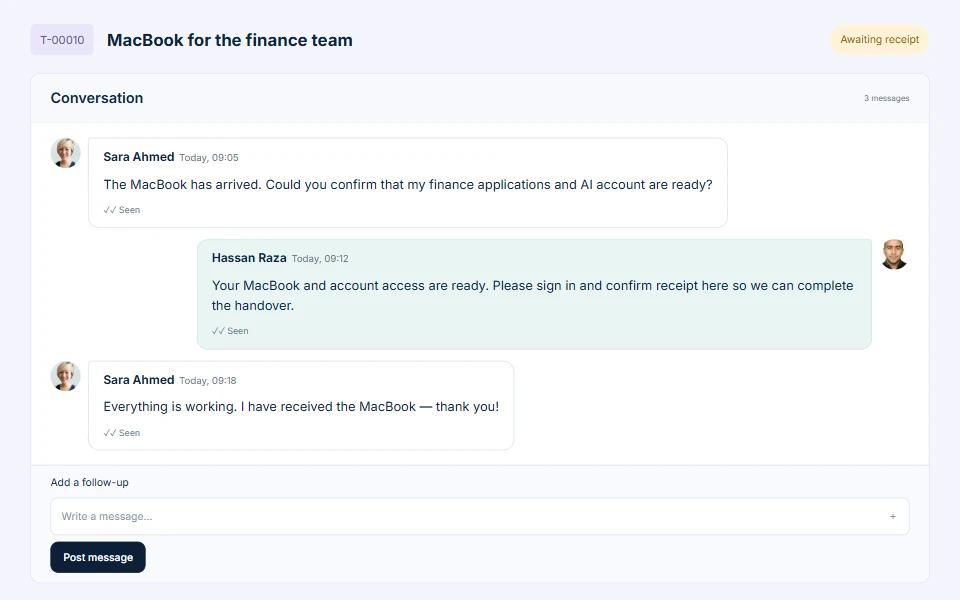
An employee’s own workspace: requests, assigned MacBook and AI account together.Illustrative company data
One request. The whole story.
REQUEST In progress
T-00010Approval history kept
PEOPLE
Conversation with context
EQUIPMENT
MB-A2404Custody & returns tracked
From request to receipt
Who asked. Who approved. Who prepared it. Who received it. Keep the complete handover on one record.
Try the workflow yourselfAdministration
Forms, approvals and assignment — configured without code.
Pick a scenario
Example routes. Your admins set the real policy.
Approved need. Assigned owner. Recorded handover.
Assets & custody
IT custody
Approved need
Employee, room or department
Gate passes, condition, reason
History preserved
Compare One Ticket Less
Tickets. Workflows. People. Assets.
One connected IT workspace.
Deployment
VMware, Hyper-V or Huawei. You manage network, HTTPS and backups.
Installation guide| Topic | Hosted workspace | On-premise appliance |
|---|---|---|
| Where it runs | Company workspace in a browser, with separate database and files | VMware, Hyper-V or Huawei VM on your infrastructure; testing status shown before requesting |
| Host, network, HTTPS, backups | Agreed with the One Ticket Less team | Your company |
| Licensing & technicians | Agreed as part of service scope | Signed licence for one installation and technician allowance; upgrades import under Administration → Licensing, no reinstall |
| Internet validation | Browser access | Not required — signed-file activation |
| Endpoint agents | Not included — core requests, approvals and assets work without them | |
| Price | Scoped quote from sales@oneticketless.com — no price is implied here | |
Your identity
Two ways to start
In your browserOnline
Explore a sample company in your browser. No installation needed.
On your infrastructure7 days
Evaluate OTL on your own infrastructure with a signed seven-day licence.
Getting started
Yes. Request a seven-day offline evaluation and select VMware / ESXi, Hyper-V, Huawei Cloud x86 or Huawei FusionCompute x86. The current packages use PostgreSQL and signed-file activation without endpoint agents. All four formats passed isolated checks; earlier native VMware/Hyper-V evidence exists, while exact final-package native acceptance and native Huawei validation remain separate. Read the package testing status before rollout. Vendor approval, an expiring download and a signed installation-bound trial licence are separate steps.
Security & rollout
The customer appliance uses signed-file activation and can operate without internet validation. Transfer an installation request to the vendor, then import the signed licence. Endpoint agents are not included. Your company manages the VM, local network, backups, stable address and HTTPS certificate. Read the offline deployment guide.
Getting started
Support requests, approvals, conversations, technician ownership and equipment records. Start with your services and responsible teams; then configure the forms and policies that connect them.
Getting started
Start with company identity and service locations. Create departments, users and responsible teams, then services and catalogue entries. Define request forms, approval rules and assignment policies. Simulate representative requests before publishing and run a pilot with employee, approver and technician accounts.
Getting started
Yes. Configure the locations your company needs and include location and department in your workflow conditions. For example, a Factory hardware request can follow a different approval route from a Head Office application request. Check each location in the simulator before rollout.
Getting started
OTL offers hosted company workspaces and separate on-premises appliances. Hosted workspaces keep company databases/files separate. Offline customers run their own appliance. Ask sales@oneticketless.com for pricing based on the required technician allowance, licence term, hosting and support. This website does not publish a fixed price.
Forms & workflows
Administration provides service and catalogue configuration, inventory types, form fields and approval workflow controls. Define what information a requester must provide, then use supported conditions to select the approval route. Validate both the form and its workflow using a sample submission.
Forms & workflows
Configure the request-purpose options in administration and match them in your workflow rules. Additional equipment can require business-need approval; replacement can collect the current asset and fault; upgrade can collect a justification or declared cost. Preview each purpose separately: the example routes on this website are illustrations, not mandatory policies.
Forms & workflows
Create a required numeric request field for the declared amount, then use its identifier in a workflow threshold condition. Add the appropriate approval stage and simulate values below, equal to and above the threshold. This is a declared amount, not an automatically calculated purchase price.
Forms & workflows
Yes. Configure a named approval group with all-member, any-member or quorum approval. The engine records each decision. A rejection vetoes the request; requesters and beneficiaries cannot approve their own requests. Test the group with distinct user accounts.
Forms & workflows
Use dated delegation for planned cover. Approval escalation can add an approver after a configured elapsed time without lowering the vote requirement. Single-authority rerouting is recorded. Group membership is fixed for that request; use delegation or revise and resubmit where a membership change is needed.
Forms & workflows
The simulator uses the same rule selection and stage resolution as submission. Provide the same employee, location, service, purpose and custom field values, then inspect the selected rule and stages. Publish the intended configuration and verify a pilot ticket with those same values.
Forms & workflows
The selected workflow revision and resolved stages are captured for the request. Publishing new conditions does not silently rewrite an existing approval journey. Review or revise the request when a changed policy needs to apply; active-account and delegation checks still apply.
Forms & workflows
The engine supports bounded conditional approval workflows, not arbitrary programs. Current documented limits include 12 stages per rule and 25 named members per group. Cyclic workflows, unrestricted scripts, automated financial postings and dynamic team-based quorum membership are not supported. Bring unusual policies to a walkthrough so they can be assessed before purchase.
Assignment & operations
Define separate assignment rules for each service and team. Use round robin for the Infrastructure queue and manual assignment for the Application queue. Check rule priority and fallback behavior in the assignment simulator so a broad rule does not override a service-specific policy.
Assignment & operations
Configure technician availability, relevant skills and active-work limits alongside assignment rules. Preview who is eligible and why candidates were skipped. Test the case where nobody qualifies so work remains visible for a manager to handle instead of assuming it was assigned.
Assignment & operations
Configure the unaccepted-ticket escalation policy and its interval. Review the notification or reassignment behavior with your team and keep assignment history available. Include worker scheduling in installation checks: timed policies need the background processing service to run.
Assignment & operations
Use the ticket journey for its current stage and owner, and the conversation for decisions and follow-ups. Read receipts show recorded viewing activity; they are not approval or proof that the requested work was completed. Use the actual approval and completion actions for those outcomes.
Assets & returns
Yes. Allocate assets to employees, rooms or departments and record their location. Use IT custody for stock held by IT. This distinguishes a shared conference-room device from a laptop issued personally to an employee.
Assets & returns
Review their assigned equipment, confirm what has physically returned, and record the return to the appropriate IT custody location with its condition and reason. Keep unreturned equipment attributable to the former employee until recovered. Deleting an account is not evidence of a physical return.
Assets & returns
Link the existing asset to the replacement request, record the return reason and condition, then issue the replacement through the approved process. Keep faulty, dead or scrapped equipment out of available stock. The original asset’s movement history should remain available.
Assets & returns
Authorized asset deletion preserves audit history. Use disposal or scrap when equipment genuinely existed and is being retired; use deletion for records that should no longer be active. Check linked custody and fulfilment records before taking either action.
VPN & records
Raise the configured VPN-access request and complete its required approvals. Provision and record the account through that request so it is associated with the employee and ticket. VPN access should not create a laptop-issuance requirement. The register is a record of access, not a VPN gateway.
VPN & records
The current register is restricted to system administrators and requires a separate vault passphrase. Impersonated sessions cannot open it, and technicians cannot browse its credentials. Unlock lasts five minutes; five incorrect attempts pause unlocking for 15 minutes. Credential reveal is a deliberate, audited action.
VPN & records
The designated vault custodian can import existing accounts during the initial import window. Reconcile the list, then finish the import to close that route. New provisioning thereafter uses approved VPN requests. Filter by source to distinguish imported accounts from ticket-provisioned ones.
VPN & records
Do not assume it does. Follow your offboarding procedure to disable access on the actual VPN platform and record the outcome against the relevant request. The register does not itself guarantee gateway revocation; include that verification in your offboarding checks.
VPN & records
No. Record the requester, decisions, owner, provisioning outcome and relevant asset or account link. Keep credentials in the protected register, not in comments, attachments or public notes. Audit records provide accountability without exposing plaintext secrets in the conversation.
Security & rollout
Administration includes MFA policy and SMTP configuration. Pilot enrollment and sign-in with representative users before enforcing the policy, and verify outbound email with the company’s SMTP settings. Plan recovery and administrator access before a broad rollout.
Security & rollout
Core requests, approvals and asset records can be used without an endpoint agent. Device telemetry is a separate rollout component. Confirm supported operating systems, installer readiness and required diagnostics with the team before including agent deployment in your purchase scope.
Security & rollout
Test each location and request purpose as an employee, approver and technician. Include rejection, clarification, absent approvers, no eligible technician, asset return and VPN offboarding. Verify permissions, email, background processing, backups and restore procedures. Agree acceptance criteria for your own policies before rollout.
Security & rollout
One Ticket Less is a product of Cipherstacks (www.cipherstacks.xyz). Contact sales@oneticketless.com with your company size, service teams, hosting needs and example policies to arrange a guided walkthrough.
Offline installation
The current appliance uses Ubuntu Server 24.04 LTS, x86-64. Ubuntu is already installed inside the VM; you do not install it separately. The kernel package version can change through reviewed maintenance and is not the same thing as the Ubuntu release.
Offline installation
Use the VMware OVA for ESXi; the Hyper-V ZIP contains a VHDX. Huawei Cloud x86 uses the Cloud QCOW2 package; Huawei FusionCompute x86 uses its separate VHD package. Do not interchange packages or rename disk extensions. Read the included platform-specific instructions and testing status.
Offline installation
The current delivery is x86-64. It is not a native ARM64/Kunpeng appliance. Confirm architecture and host compatibility with the vendor before requesting a package.
Offline installation
Request the correct package, verify its authenticated SHA-256 checksum, import a new VM, map its network and boot it. Open the VM portal address from a workstation, trust the approved HTTPS certificate, retrieve the private owner setup key at the VM console, create the company owner, download the installation request, obtain a signed licence and import it. Then configure and test company policies. Download the illustrated installation handbook.
Offline installation
Run OTL Linux commands inside the OTL appliance VM. ESXi/Hyper-V management is a different system. Windows PowerShell VM-creation commands run on the Hyper-V host; browser setup runs on a client workstation. The PDF labels these locations.
Offline installation
The documented customer route is the supplied virtual appliance. An existing server needs a compatible virtualisation environment, or a separately supplied and qualified OTL container bundle. The VM disk is not a bare-metal installer ISO. Do not treat the appliance instructions as a generic source-code installation recipe.
Offline installation
The reference appliance build uses 4 vCPUs, 8 GB RAM and a 64 GB logical system disk. Actual sizing must follow employee count, concurrency, attachments, retention and restore requirements. Agree sizing before deployment; thin provisioning still consumes storage as data grows.
Offline installation
Open the HTTPS address displayed by the OTL VM console, not the ESXi/Hyper-V management IP. Use a reserved DHCP address or approved static address. You can configure an internal DNS name and the matching certificate/origin. Customers control their own DNS and certificate arrangements.
Offline installation
No public domain is required for initial IP-based HTTPS setup. Signed-file activation can be completed by transferring the request and returned licence through an approved separate device/media process. Services you choose, such as external SMTP or public certificate issuance, may have their own connectivity requirements.
Offline installation
Initial HTTPS uses an appliance-generated private CA. Have your IT team verify its fingerprint and distribute its public root certificate, or configure an approved customer certificate. Check the exact URL and clock as well. Never distribute the private CA key or make a permanent certificate-warning bypass part of acceptance.
Offline installation
At the authenticated OTL VM console run sudo otl-show-setup-key. Keep the output/private setup-key file confidential and transfer it only to the authorised setup workstation. It is separate from your signed licence and from the public HTTPS CA certificate. Never post it in chat or screenshots.
Offline installation
The current recovery fix can refresh an unchanged generated IP/internal-HTTPS binding on startup when exactly one replacement VM IPv4 address exists. Custom domains/proxy configurations are preserved and need a coordinated change. Use a stable address in production and follow the handbook if startup reports an ambiguous network.
Offline installation
Allow HTTPS TCP 443 from approved users. The proxy also maps HTTP TCP 80 for redirect/certificate workflows. Restrict any SSH management access to approved administrators. Do not expose PostgreSQL 5432 or application port 3000 publicly. Internal mail/directory/time services need their own approved paths.
Offline installation
No. Current formats passed isolated controller/boot/network recovery checks. Earlier native VMware and Hyper-V checks exist, but the exact final refreshed packages still need native-host acceptance. Native Huawei Cloud/FusionCompute validation remains pending. An isolated boot is not universal platform certification.
Licensing & renewal
Ask sales for an explicitly issued 30-day offline licence and the required technician allowance. Complete VM/company setup, download the installation request under Administration > Licensing and send it to the vendor. Import the returned signed JSON and confirm its exact dates, company and quota. The seven-day website evaluation is not automatically a 30-day licence.
Licensing & renewal
Downloading or importing the VM is not activation. Operational use needs a valid applicable signed licence imported into that installation. For a trial, confirm the issued start/end dates; do not assume unused download time extends the signed term.
Licensing & renewal
The appliance exports an installation request. The vendor signs a licence bound to that installation, customer, validity and allowance. You transfer the signed file back and import it. Verification uses public keys in the appliance; vendor private signing keys are not given to customers and no internet validation is required.
Licensing & renewal
Eligible active ticket-working accounts consume technician seats according to the signed licence, including applicable Infra/Application technician and ticket-working manager/permission roles. A person is counted once. Employee-only, HOD-only and admin-only accounts are not all technicians; vendor-support identities do not consume customer seats. Confirm the current count in Licensing.
Licensing & renewal
Yes. Purchase the additional allowance, then ask for a newer signed licence for the same installation with the increased limit. Import it under Administration > Licensing while offline. No internet or reinstall is required. A downgrade may require releasing excess seats first.
Licensing & renewal
When the applicable validity/grace policy no longer allows operation, operational writes and automation are blocked. Records remain available for permitted reading/export and licence renewal; expiry does not itself delete customer data. Import a valid renewal for the same installation and check its terms.
Licensing & renewal
No. Keep the existing VM and installation identity. Obtain a newer signed renewal for that installation and import it in Licensing. Reinstalling or resetting the identity can make a licence issued for the old installation unusable.
Licensing & renewal
A fresh offline appliance requires a valid applicable licence for normal writes and scheduled automation. The owner can access activation-related functions and permitted records, but being an administrator is not a licence bypass.
Licensing & renewal
Clock rollback checks and signed licence terms are enforced, but a fully offline application cannot promise absolute protection against a hostile administrator restoring an entire VM and its historical clock/state. Keep accurate approved time, honour the licence and do not treat snapshots as a renewal method.
Backup & maintenance
Back up PostgreSQL together with matching customer files/encryption keys, deployment secrets/configuration and HTTPS CA/certificate state. Keep encrypted off-VM copies and test a populated restore on a separate recovery VM. A database dump or hypervisor snapshot alone is not proof of recoverability.
Backup & maintenance
The current offline appliance requires PostgreSQL and does not silently fall back to SQLite. A legacy DB_PATH name can remain as a filesystem anchor for keys/files; that filename is not evidence SQLite is the active database.
Backup & maintenance
apt update refreshes repository metadata; it does not install upgrades. Fully disconnected servers need an approved internal mirror/offline package process. Review and approve OS package changes, back up first and reboot for an updated kernel when required. OTL container/application/database-major updates follow separate vendor maintenance instructions. Do not blindly change distribution or use unreviewed container images.
Backup & maintenance
A licence grants the agreed term and allowances; it is not an application update. Maintenance packages use separate update-signing trust and an approved workflow with preflight, backup, independent approval, a maintenance window and postchecks. Follow the release instructions and recovery plan.
Backup & maintenance
Yes. The November 2026 release notes record remaining Ubuntu guest-kernel findings and platform-validation gaps. Available supported updates and mitigations were applied/tested where possible; mitigations are not proof a vulnerability is patched. Review the delivered kernel/testing status and ongoing maintenance before production acceptance. No vulnerability-free guarantee is made.
Backup & maintenance
No ISO certification is claimed on this website. Product controls can support an organisation's processes and evidence, but certification requires the applicable organisational scope and independent assessment. Audit-readiness screens are not a certificate.
Accounts & access
OTL provides directory/account integration controls. Configure and test the connection, mappings and permissions with your directory administrator before bulk rollout. An offline appliance may reach approved internal directory services without public internet. Directory policies, certificates and account lifecycle still need customer configuration.
Accounts & access
Use the configured account-onboarding/password policy and internal SMTP. Users should replace temporary credentials as required. Reset links must use a portal hostname recipients can resolve and reach. DNS A/CNAME records route the hostname; they do not send email. Test the full reset flow before rollout.
Accounts & access
These are separate accounts. The customer controls its delivered VM console credentials and company-owner password. Vendor-console credentials and signing passphrases stay with the vendor. Never reuse demo credentials or share private setup/signing keys.
Accounts & access
Company administrators configure the customer MFA policy and can require enrolment where appropriate. Do not copy demonstration bypass settings into production. Vendor operations have their own protected authentication requirements. MFA recovery should follow a documented identity-verification procedure.
Accounts & access
This website help assistant searches the published OTL FAQ locally in your browser. It is not a live agent or generative-AI service. Chat messages are not sent to a chat backend or stored by this assistant. For a quotation or an unanswered question, choose the sales email link; that opens your email app and you decide whether to send it.
Accounts & access
No. The public help assistant cannot access customer workspaces, private licences, mailbox accounts, passwords or vendor actions. Do not enter credentials or private keys. Use your company administrator or the approved sales/support channel for account-specific help.
No match. Ask our team.
Talk to us
Bring one real process. We’ll show you how it fits.
One Ticket Less vs the alternatives
Less reading. A clearer choice.
Select a product or a capability.
One Ticket Less vs the alternatives
Less reading. A clearer choice.
Select a product or a capability.
Return to One Ticket Less or explore the product guides.
ONE TICKET LESS
One Ticket Less is an IT service management product built to connect requests, people and equipment.
IT work often spans a request queue, approval messages and a separate asset register. One Ticket Less brings those records together so employees can follow progress and service teams can see the context behind a request.
Administration controls let a company configure supported services, forms, locations, approval routes and technician assignment rules. The product’s practical guides explain both the supported processes and their limits.
Contact sales@oneticketless.com for a walkthrough and deployment discussion.
Explore the online demo, or evaluate for seven days on your own VMware, Hyper-V or Huawei infrastructure.
Asset management / PRACTICAL GUIDE
A practical guide to stock, shared equipment, replacements and resignation returns.
One Ticket Less product team · 11 operational steps · Detailed guideA practical guide to stock, shared equipment, replacements and resignation returns. This walkthrough uses an illustrative company setup. Adapt the policy to your organization and validate it before rollout.
Review each asset’s tag, serial, category, location and condition. A record is only useful if it describes the physical item. Resolve imported custody information before treating stock counts as a promise of availability. The screenshot shows an illustrative inventory, not live customer equipment.
Use employee assignment for a personally issued device, room or department allocation for shared equipment, and IT custody for items held by the service team. A conference-room computer should not need an invented employee account. Keep the location accurate when the asset moves between sites.
Find an available asset, open its profile through the equipment name, and use the assignment action appropriate to the workflow. For ticket fulfilment, keep the asset linked to that request. Record handover and any required recipient confirmation instead of assuming an assignment entry proves physical receipt.
When taking equipment back, record whether the return follows a resignation, replacement or another supported reason. Capture the condition. A laptop with a fault, a dead device and a serviceable spare should not all become available stock. Use the appropriate lifecycle state while retaining the movement history.
Review all assets assigned to the departing person. Confirm each physical return before moving it to IT custody at the correct site. Keep missing items attributable until recovered. Account deletion must not turn an unreturned laptop into available inventory.
Use scrap or disposal for real equipment that is being retired. Authorized deletion is for removing an active record while preserving audit history. Before either action, inspect linked requests and custody. Finish by checking the employee view, stock view and asset history agree with the physical outcome.
Open Assets, select category, and search/filter by location and lifecycle. Check tag and serial against the real equipment.
Check: The record is the correct individual device, not merely the same model.
Click the equipment name. Review custody, location, status, linked tickets and movement history.
Check: You know whether custody was confirmed or still requires imported-record reconciliation.
Use Assign user in the Custody column or the profile’s corresponding action. Select the correct employee and review the dialog before confirming.
Check: For ticket fulfilment, use linked issuance so the request and asset remain connected.
Use Assign to room / department and select its real destination and site.
Check: A conference room is not represented by a fake employee account.
Use Return to IT custody or Record return where offered. Supply the destination, reason and condition requested in the dialog, then save.
Check: The device has actually been received and now shows the correct IT custodian.
Identify both devices. Record the old laptop’s return and fault, keeping it in the appropriate non-available state. Issue the replacement separately through the approved work.
Check: The broken device is not included in usable stock; both movements remain traceable.
Review every asset assigned to the person. Record each confirmed return and leave unreturned items attributable until recovered.
Check: Deleting the employee account is not used as evidence of return.
Select the intended stock records and use Put selected in IT custody. Review the count and common destination before confirming.
Check: No still-held employee equipment is included by accident.
Open Change location on the profile, choose the actual site and save. Recheck the inventory with that location filter.
Check: Location and custody both reflect reality; they are separate fields.
Use the supported scrap/disposal lifecycle for real retired equipment. Use authorized deletion for records to remove from active use, after reviewing links and custody.
Check: Audit history is preserved; deletion is not a substitute for ordinary retirement.
Check stock totals, the employee’s assets and the profile history. Complete any required recipient acknowledgment with the actual recipient.
Check: Physical item, custody, location, lifecycle and ticket fulfilment agree.
Check permissions and whether the asset is available rather than issued or retired.
Review filters, lifecycle, condition and reconciliation state.
Inspect active/deleted records before creating another item. Never falsify the real serial to pass validation.
Check that return saved for the correct individual asset and no other same-model item remains assigned.
Run the normal path and an exception with separate requester, approver and technician accounts. Compare the visible result with your written policy, and keep a record of the checks.
Explore the online demo, or evaluate for seven days on your own VMware, Hyper-V or Huawei infrastructure.
Administration / PRACTICAL GUIDE
Turn a written policy into conditions, named decisions and a route you can verify.
One Ticket Less product team · 13 operational steps · Detailed guideTurn a written policy into conditions, named decisions and a route you can verify. This walkthrough uses an illustrative company setup. Adapt the policy to your organization and validate it before rollout.
Imagine a company where Factory equipment requires department approval, while higher-value requests also need Finance. Before opening the editor, write down who requests, who benefits, which information changes the route and who can decide. Separate approval from assignment: authorizing a purchase is not the same as choosing the technician who fulfils it.
In Administration, configure the relevant locations, departments and services. In Form builder, add the fields the policy requires. For a spending threshold, use a required numeric field and retain its identifier for the condition. The amount is supplied by the requester; it is not an automatic purchasing calculation. Avoid optional fields for information that determines whether an approval is required.
Open Approval workflows. Set the matching service, location or other supported selectors, then add ordered stages. Use a mapped manager, routing authority or named employee where appropriate. For group approval, choose all members, any one member or a quorum. Add stage conditions only when a stage should be skipped for some requests. The screenshot shows the group-member selector and conditional stage controls; its selected people and P2 condition are examples, not a recommended company policy.
Simulate a normal request and a request from another location. For a threshold, test below, exactly at and above the boundary. Confirm the selected rule and each included or skipped stage. Also test a requester who is an approver: the requester and beneficiary cannot approve their own request. A rejection is a veto, not simply one negative vote to be outweighed.
Save the draft, review it, then publish the intended settings. Submit a pilot request using the same values as the simulation and compare the actual approval route. Existing requests retain their captured workflow revision; a new publication does not silently rewrite their decisions. Keep the pilot acceptance results with your rollout notes.
The engine supports conditional, ordered approvals with bounded groups. It does not promise arbitrary cyclic processes, executable scripts or automated financial postings. Group membership is captured for the request; use supported dated delegation for cover rather than assuming a later team change rewrites an active group.
Click Add workflow. Enter Workflow name, select Request type, set Rule priority and review Enabled. Use a descriptive name such as Factory equipment approval.
Check: The rule is present as a draft; it is not yet the published policy.
Set For employee, For department, For category, For site, For request purpose and For equipment only where needed. Leave a selector at Any only when the rule should cover every value.
Check: Your sample request matches every selected restriction.
Under Run this rule when, click Add condition. Choose All conditions (AND) or Any condition (OR). Click Add comparison; choose Field and Operator, then enter Value / comma-separated list. Add nested group for grouped logic.
Check: AND requires every comparison; OR requires one. Negate comparison reverses a comparison.
Use a number for a numeric field, true or false for a checkbox, and comma-separated values for Is one of. Has a value tests presence. Create required custom numeric fields in Form builder before using a spending threshold.
Check: Test below, exactly at and above a threshold. A declared cost is not an automatic purchase-price calculation.
Click Add approval stage. Enter Stage label. For Completion rule choose One designated authority, then choose Single authority source: mapped manager / HOD, routing authority or Named employee. Select Named single approver when using that source.
Check: The intended active person resolves for the sample requester.
For a group, choose All selected members, Any one selected member or A minimum number of members. Select Group members and enter Required votes for quorum.
Check: The threshold is achievable. Requesters and beneficiaries cannot approve themselves; one person gets one vote per stage.
Add further stages, use Move up or Move down, and configure Only include this stage when for optional decisions.
Check: Stages run in order. Conditional stages are included from the submission values, not arbitrary later decisions.
Select Additional approver after deadline and set Elapsed hours after this stage becomes current.
Check: This adds an alternate; it never auto-approves or lowers the vote threshold. Time is elapsed, not business-calendar time.
Open Manage dated authority delegation. Use Create dated delegation for the appropriate authority and dates. Review the confirmation before saving. Use Revoke delegation when cover must end early.
Check: Delegation is an immediate audited security action, not a configuration draft.
Expand Copy this workflow to other equipment or catalogue options. Select Destination type, choose targets and click Create workflow copies. Review all inherited conditions.
Check: Copies are independent drafts; changing the original later will not synchronize them.
Use Test a sample request, providing the requester, routing authority, equipment and relevant custom values. Click Run simulation.
Check: The selected rule, included stages and actual approvers match the written policy. No ticket is created.
Click Save draft for unfinished work. Use Review & publish when ready and review the proposed change before completing publication. Reopen the configuration.
Check: Saved values remain. An unsaved or saved draft alone does not activate the policy.
Submit a pilot with the same values. Compare the preview and actual route. Sign in as distinct approvers; test approve, reject and clarification paths.
Check: Any rejection vetoes the request. Existing tickets retain their captured workflow revision.
Compare priority, selectors and the actual request type/purpose. Test broad rules as well as the specific rule.
Check active accounts and manager/routing mappings. Do not select an unrelated person to hide a missing mapping.
Compare its condition with the submitted snapshot, including numeric and checkbox values.
That is expected snapshot behavior. Use the supported revision/resubmission route when policy must change.
Run the normal path and an exception with separate requester, approver and technician accounts. Compare the visible result with your written policy, and keep a record of the checks.
Explore the online demo, or evaluate for seven days on your own VMware, Hyper-V or Huawei infrastructure.
Equipment workflows / PRACTICAL GUIDE
Keep the familiar request experience while applying the right policy to each reason.
One Ticket Less product team · 12 operational steps · Detailed guideKeep the familiar request experience while applying the right policy to each reason. This walkthrough uses an illustrative company setup. Adapt the policy to your organization and validate it before rollout.
Additional means another item is needed. Replacement means an existing device is being exchanged. Upgrade means a different capability is justified. Agree those definitions with your IT and department owners before configuring the available choices. Different purposes can share a route, but they should not lose the information that explains the need.
In administration, configure the purpose options and relevant request fields. For replacement, collect the current asset and the reported issue. For upgrade, collect the business justification and any required declared amount. Make essential information required so the approval rule does not have to guess from a free-text subject.
Use purpose and other supported request conditions in Approval workflows. An additional laptop might require the department and IT; an upgrade may include an extra conditional decision. Clone or reuse a common policy where supported rather than maintaining conflicting copies. The accompanying editor screenshot illustrates conditional stages, not a fixed route for all three purposes.
Simulate each purpose with the same person, service, location and field values you will submit. Check the selected rule and approvers. Publish, then raise a pilot request for each scenario. A preview should be assessed against that exact input and configuration revision, not against a different employee or unpublished draft.
Approval confirms the need; it does not prove equipment exists or has been received. The technician still follows the asset reservation, issue and receipt process. For replacement, record the old device return and its condition. Do not mark a broken device available just because its custodian changed.
Test rejection, clarification, missing stock and an absent approver. Verify how your team records an item that will not be supplied, rather than assigning an unrelated asset merely to finish a ticket. Retain the actual decision and fulfilment history for later review.
Review Display label, Available to employees and Require existing asset for additional, replacement and upgrade. Rename labels only while preserving their meaning.
Check: The required purposes are visible and their labels make sense to employees.
Enable Require existing asset for the relevant purposes.
Check: This collects the current device reference; it does not automatically return or issue equipment. Technician CRFs remain separate.
In Form builder, select the request type and configure justification and required routing fields. Save the draft.
Check: Fields used by policy are collected; a spending condition uses a numeric field rather than free-text currency.
In Approval workflows, click Add workflow. Set Request type and For request purpose, plus site, category, department or equipment restrictions. Add approval stages and conditions.
Check: The rule matches the intended purpose and does not lose to a higher-priority broad rule.
Expand Copy this workflow to other equipment or catalogue options. Choose Destination type and targets, then Create workflow copies.
Check: Each copy retains intended stages but has reviewed selectors. Copies do not stay synchronized.
Use the simulator with additional purpose and required field values.
Check: No old-device selection is required unless you explicitly enabled that requirement; correct approvers resolve.
Use replacement with an assigned test asset. Repeat without one.
Check: The valid sample selects the expected route; the missing-asset case is blocked where configured.
Provide the upgrade purpose, asset where required and declared amount/justification. Test below, equal to and above thresholds.
Check: Extra stages appear only under their configured conditions.
Save draft, then Review & publish.
Check: The intended revision is published, rather than merely saved in the editor.
Open New request, choose the configured equipment service, select the purpose, complete the required fields and review the approval preview before submitting. Repeat for all three purposes.
Check: Actual stages match the preview for the same person, values and revision.
As the technician, inspect requirements and stock. For replacement, record old-device return and condition, then issue the replacement through the request.
Check: Approval alone has not reserved or physically handed over stock; faulty equipment is not marked usable.
Complete required receipt confirmation. For an item that will not be supplied, use the supported disposition control and reason rather than assigning an unrelated asset.
Check: The history explains every requested item’s outcome and the final ticket state.
Check availability and publication.
Check request type, purpose, selectors and rule priority.
Record the physical return separately; purpose selection only records intent.
Compare input values and revision before diagnosing a rule-engine issue.
Run the normal path and an exception with separate requester, approver and technician accounts. Compare the visible result with your written policy, and keep a record of the checks.
Explore the online demo, or evaluate for seven days on your own VMware, Hyper-V or Huawei infrastructure.
THE ONE TICKET LESS FIELD GUIDE
Detailed walkthroughs, actual product screenshots and practical checks for your team.
Request the VMware appliance, configure your installation and activate a seven-day signed trial.
Read the installation guideTurn a written policy into conditions, named decisions and a route you can verify.
Read the guideGive different service teams different assignment policies without confusing ownership.
Read the guideConnect an account to its employee and approved request without putting credentials in conversations.
Read the guideKeep the familiar request experience while applying the right policy to each reason.
Read the guideA practical guide to stock, shared equipment, replacements and resignation returns.
Read the guideUse the ticket conversation as the shared history of a decision, not another disconnected inbox.
Read the guideBuild service catalogues in One Ticket Less. Configure infrastructure and application services, request forms, technician routing and approval policies.
An HR request, an approval trail and a named recipient before handover.
Configure response and resolution targets with calendars, holidays and pause rules.
Review complaints, equipment demand and recorded handovers without confusing their totals.
Understand active workload, resolutions, confirmation and reopened work together.
Keep a directory of project progress, milestones, outcomes and reviewed publication.
Explore the online demo, or evaluate for seven days on your own VMware, Hyper-V or Huawei infrastructure.
Employee onboarding
An HR request, an approval trail and a named recipient before handover.
Use an authorised account in your company’s installation. Confirm your service and location scope. Test configuration changes with fictional records before publishing them for employees.
New-employee equipment is available to users with HR location permissions. Confirm the HR requester has the correct site scope before testing.
In Services & catalogues, enable the equipment entry for HR and for new-joiner equipment. Keep employee visibility separate if needed.
Configure approval conditions for the onboarding request type and relevant department or location. Choose the authorities required by that company; do not assume every company uses HOD then IT.
As the authorised HR user, choose For a new employee — laptop/assets instead of For myself.
Enter Upcoming employee name, Designation and Department. Add Expected joining date when known. Check the service location populated from the selected department.
Choose the available equipment requirements and explain the business need. Confirm quantities and distinguish physical equipment from access requests.
Check the request summary and any approval preview. Submit and retain the reference so HR and IT follow the same record.
Follow the ticket approvals and equipment fulfilment controls. Preparation does not mean the equipment has already been issued to the employee.
Before handover, use Link employee account. Select an active eligible account matching the employee and organisational context; do not use the HR requester as the recipient.
Issue the recorded asset to the linked employee and follow the required receipt confirmation. Check the asset custody, linked ticket and movement history agree.
Repeat the journey as the intended user, including a user outside the permitted scope. Confirm the visible choices, saved record and history match the policy. If an action is absent, check the user’s permissions and the published configuration before changing the workflow.
Configuration labels and available actions depend on the installed version and your role. These instructions describe the current local build.
Explore the online demo, or evaluate for seven days on your own VMware, Hyper-V or Huawei infrastructure.
Projects
Keep a directory of project progress, milestones, outcomes and reviewed publication.
Use an authorised account in your company’s installation. Confirm your service and location scope. Test configuration changes with fictional records before publishing them for employees.
This guide describes the project controls in the current local build. A dedicated project screenshot is not included; unrelated screens are not presented as this module.
Use Projects to open the internal project directory. This is a separate place for delivery work rather than another ticket status.
Confirm that your role can create or edit projects. Project directory content and exports are intended for IT staff; publication does not grant general employee access.
Choose Add project. Give the project a clear name and describe the work so colleagues can find it later.
Use the appropriate phase: planned, in progress, completed or on hold. Update the phase when delivery changes, not just when the description is edited.
Record the challenge, work and results in the available project sections. Distinguish planned benefits from achieved outcomes.
Add milestone titles, dates and statuses. Use milestones for meaningful checkpoints that help colleagues understand delivery progress.
Maintain the available metrics and supporting project information. Add a website link only where it is relevant to the project.
Use Submit for review when the draft is ready. An authorised publisher can then Publish to directory; publication records the reviewed version.
Use the revision history to trace edits. Archive project when it should leave the active directory, or Restore draft when the available workflow requires further revision.
Use Find a project and the available filters. For bulk edits, select projects, set only the fields to change, preview the changes and supply a reason before confirmation.
Repeat the journey as the intended user, including a user outside the permitted scope. Confirm the visible choices, saved record and history match the policy. If an action is absent, check the user’s permissions and the published configuration before changing the workflow.
Configuration labels and available actions depend on the installed version and your role. These instructions describe the current local build.
Explore the online demo, or evaluate for seven days on your own VMware, Hyper-V or Huawei infrastructure.
Reporting & accountability
Review complaints, equipment demand and recorded handovers without confusing their totals.
Use an authorised account in your company’s installation. Confirm your service and location scope. Test configuration changes with fictional records before publishing them for employees.
Decide whether you are measuring complaints, requested equipment, completed handovers or technician resolution work. These are different measures.
Open Service reports with an authorised account. Select the reporting period and available scope controls; results remain limited by permissions.
Use Complaints by category for incident tickets. Open a category bar to inspect the underlying complaints instead of treating the chart as the whole investigation.
Use Asset requests by department. These figures represent requested units, not simply the number of tickets.
Compare requested, fulfilled-to-date and outstanding-now values. A ticket with several items can be partly fulfilled.
Use Monthly issuance to see recorded handovers within the period. A handover may belong to a ticket raised before the reporting period.
Keep physical handovers and subscription assignments distinct. Repeat handovers are separate events; consumables use quantities.
Open the linked ticket or asset to inspect requester, recipient, assigned technician, decisions and movement history. Current assignee alone does not prove who performed an earlier action.
Use the dataset’s Export CSV action. Retain the period and measure definition with the export so colleagues can interpret it correctly.
Investigate overdue work, repeated returns and outstanding requirements. Record follow-up on the appropriate ticket rather than maintaining an unlinked spreadsheet narrative.
Repeat the journey as the intended user, including a user outside the permitted scope. Confirm the visible choices, saved record and history match the policy. If an action is absent, check the user’s permissions and the published configuration before changing the workflow.
Configuration labels and available actions depend on the installed version and your role. These instructions describe the current local build.
Explore the online demo, or evaluate for seven days on your own VMware, Hyper-V or Huawei infrastructure.
Assignment / PRACTICAL GUIDE
Give different service teams different assignment policies without confusing ownership.
One Ticket Less product team · 12 operational steps · Detailed guideGive different service teams different assignment policies without confusing ownership. This walkthrough uses an illustrative company setup. Adapt the policy to your organization and validate it before rollout.
A useful starting policy is “Factory hardware goes to the Factory Infrastructure team by round robin; application access goes to the Application team for manual assignment.” Write both rules explicitly. A single broad automatic rule can otherwise produce the wrong experience for the second team.
Open Administration → Ticket assignment. Review default behaviour first: it governs requests without an enabled matching rule. Add specific assignment rules for the relevant services and locations, select the responsible team, and choose the assignment method. Keep manual work visible to the manager or authorized assigner; manual does not mean ownerless work can disappear from the queue.
Configure technician skills, availability and capacity. Someone who belongs to a team may still be unavailable or already at their active-work limit. Round robin rotates among eligible candidates; it should not be interpreted as a promise that every person receives an identical total regardless of leave and workload.
Preview a sample request for each service. Inspect the matching rule, selected team, method and skipped candidates. Test an employee from a different location and a case where no technician qualifies. Decide who will review that queue before publishing. The assignment overview in the screenshot shows approvals preceding the assignment decision.
Set the supported unaccepted-ticket escalation behaviour and interval. Decide when the manager should be notified and when another eligible technician may be offered the work. Verify that background processing runs in the installation and review the resulting assignment history during a pilot.
Publish the reviewed draft. Raise one Infrastructure ticket and one Application ticket through their normal approval routes. Confirm that only the intended request is automatically assigned, while the other remains available for authorized manual assignment. Keep those two examples as regression checks when changing rules later.
Open 1 · Default behaviour and choose the fallback assignment behaviour and limit.
Check: You know who will handle requests that do not match a custom rule.
In 2 · Assignment rules, click Add assignment rule. Enter Rule name and Priority, check Enabled, select Service family or Service type, Location and Catalogue entry. Choose Send to team and round-robin Assignment method.
Check: The rule matches only the intended Infrastructure work.
Select Technician roster, Required skills and Active-ticket limit. Leave the limit empty only to inherit the default.
Check: Automatic rules have a roster; all required skills must match.
Add a separate rule for the Application service and team. Choose the manual assignment method and review priorities for overlap.
Check: The Application rule is not overridden by a broader automatic rule.
In 3 · Technician skills, availability & capacity, enter one skill per line and Save draft to refresh selectors. Choose Technician, click Add technician profile and assign Skills.
Check: The profile belongs to the intended active technician.
Review Available now. Uncheck to pause and optionally set If paused, resume at (UTC). Set Individual active-ticket limit where needed.
Check: Assigned queued, in-progress, on-hold and waiting-for-requester work counts; resolved and closed work does not.
Enter Shift timezone (IANA), such as Asia/Karachi. Click Add weekly shift, select Shift starts on and local Start/End times.
Check: An earlier end means overnight; no shifts means any hour is eligible.
Click Add leave interval. Enter Leave begins and Leave ends in UTC.
Check: Converted times match the intended local leave period.
Review Acceptance deadline and its escalation action. Agree manager notification or re-offer behavior and verify the background worker is running.
Check: The team understands what happens to an unaccepted request.
In 4 · Test before publishing, set requester, beneficiary, catalogue, location, request type, priority and Sample time (UTC). Enter equipment/custom values where relevant. Click Preview approvals & assignment.
Check: Review the matched rule, team, selected technician and eligibility reasons. Simulation consumes no turn and sends no notification.
Run samples during leave, outside shifts, at capacity and with no eligible roster.
Check: No candidate goes to manager review rather than falling through to a weaker rule.
Save draft, review and publish. Raise one request per service, complete approvals and inspect assignment history.
Check: Infrastructure is automatic; Applications remains manual. Authorized overrides include an audited reason.
Check account, team permission, roster, skills, shift, leave, pause and capacity.
Inspect the winning rule and broad family matches.
Check whether shifts are absent and verify timezone/overnight configuration.
Check request acceptance state, interval, action and background processing.
Run the normal path and an exception with separate requester, approver and technician accounts. Compare the visible result with your written policy, and keep a record of the checks.
Explore the online demo, or evaluate for seven days on your own VMware, Hyper-V or Huawei infrastructure.
Service catalogues
Build service catalogues in One Ticket Less. Configure infrastructure and application services, request forms, technician routing and approval policies.
Use an authorised account in your company’s installation. Confirm your service and location scope. Test configuration changes with fictional records before publishing them for employees.
List recognisable choices such as laptop support, SAP access and application errors. Separate the service name from the team responsible for it.
In One Ticket Less administration, open Service types & catalogues. Use New service type and select the appropriate Service team: IT infrastructure or IT applications.
Choose Add service type. Give the service a customer-facing name and leave Enabled selected when it should be available. These names do not create new permission engines.
Choose Add catalogue entry, enter its Catalogue entry name and select its Service type. Create separate entries when the questions or approval policy differ.
Select Support / access request or Equipment request as appropriate. The existing VPN entry uses its dedicated VPN access form.
Set Display order and Enabled. For equipment, review employee, HR and new-joiner availability separately; these audiences need not see the same choices.
Use Form builder and the applicable request configuration to collect the information the team needs. Give required fields clear labels and check conditional questions with each choice.
Create matching approval conditions and assignment rules. For example, application access can require a manager decision and then manual assignment to the Applications team.
Use the rule simulator with an employee, department, location and service that should match. Also test a service that should not match so broad rules do not capture it.
Publish the reviewed settings, open the employee catalogue and submit a test request. Compare the actual approval route and selected team with the preview.
Repeat the journey as the intended user, including a user outside the permitted scope. Confirm the visible choices, saved record and history match the policy. If an action is absent, check the user’s permissions and the published configuration before changing the workflow.
Configuration labels and available actions depend on the installed version and your role. These instructions describe the current local build.
Explore the online demo, or evaluate for seven days on your own VMware, Hyper-V or Huawei infrastructure.
Service targets
Configure response and resolution targets with calendars, holidays and pause rules.
Use an authorised account in your company’s installation. Confirm your service and location scope. Test configuration changes with fictional records before publishing them for employees.
Define response and resolution expectations separately for each priority. Record which hours count and which waiting states may pause the clock.
In administration, open the Working calendars & service targets panel. Review the existing configuration before creating another calendar.
Enter Calendar name and Timezone. Choose the timezone used by the support team rather than relying on the browser timezone.
Enter Start hour and End hour and select the working weekdays. Confirm the end follows the start and the schedule reflects actual staffed hours.
Enter holidays as one YYYY-MM-DD date per line. Review the year and dates before adding the calendar.
Under priority targets, select the Working calendar. Use an appropriate scoped policy where the configuration provides one for the service context.
Set Response target in working minutes for each priority. For example, 60 means one working hour, not necessarily one elapsed hour.
Set Resolution target in working minutes. Review Pending and Waiting for requester pause options against the agreed policy.
Preview representative requests around the end of a working day, weekends and holidays. Save and publish only after the computed targets match expectations.
Create a new request and check its displayed deadlines. Existing tickets retain their original targets; publishing a new policy is not a retrospective rewrite.
Repeat the journey as the intended user, including a user outside the permitted scope. Confirm the visible choices, saved record and history match the policy. If an action is absent, check the user’s permissions and the published configuration before changing the workflow.
Configuration labels and available actions depend on the installed version and your role. These instructions describe the current local build.
Explore the online demo, or evaluate for seven days on your own VMware, Hyper-V or Huawei infrastructure.
IT performance
Understand active workload, resolutions, confirmation and reopened work together.
Use an authorised account in your company’s installation. Confirm your service and location scope. Test configuration changes with fictional records before publishing them for employees.
Use an account authorised to view the team. Performance numbers reflect the available service scope, not necessarily every team in the company.
From Technician performance, open Performance report to inspect the technician-level measures.
Set Resolved from and Resolved through, then Apply period. Use All time to remove the period restriction.
Review Active work to understand current ownership. Do not describe it as the number resolved in the chosen period.
Read Resolved, Confirmed and Awaiting confirmation together. Work awaiting employee confirmation should not be silently equated with confirmed closure.
Inspect Reopened alongside volume. A high count can warrant investigation of recurring issues or incomplete fixes; it is not evidence by itself of poor performance.
Check the completed-resolution timing measure and its sample count. Requester confirmation time is excluded from the resolution-time summary.
Resolution credit belongs to the technician who completed the work. Reassignment should not be mistaken for transferring historical resolution credit.
Select a technician for resolution history. Compare the underlying request events before drawing conclusions from a small sample.
Discuss workload, priority, complexity, reopened work and elapsed resolution time together. Use findings to improve staffing and routing, not just rank raw ticket totals.
Repeat the journey as the intended user, including a user outside the permitted scope. Confirm the visible choices, saved record and history match the policy. If an action is absent, check the user’s permissions and the published configuration before changing the workflow.
Configuration labels and available actions depend on the installed version and your role. These instructions describe the current local build.
Explore the online demo, or evaluate for seven days on your own VMware, Hyper-V or Huawei infrastructure.
Service desk / PRACTICAL GUIDE
Use the ticket conversation as the shared history of a decision, not another disconnected inbox.
One Ticket Less product team · 10 operational steps · Detailed guideUse the ticket conversation as the shared history of a decision, not another disconnected inbox. This walkthrough uses an illustrative company setup. Adapt the policy to your organization and validate it before rollout.
Open the ticket and check the current stage, assigned technician and any pending approver. Those fields tell you whether the next action is a technical investigation, a management decision or a response from the requester. Read that context before posting another request for an update.
Describe what you checked, what changed and what you need next. Keep the message tied to the specific request. For example, state that the approved device is ready and ask the recipient to confirm handover, rather than writing only “done.” Never add credentials to a conversation that is visible beyond the protected register.
Use supported collaboration and mentions to involve the people needed for the work. Assignment still identifies the responsible technician; adding a collaborator does not automatically transfer responsibility. Managers should be able to understand why an extra person became involved from the written context.
The Seen control exposes recorded viewing activity with names, photos where available and timestamps. It helps establish whether an update was viewed. It is not an approval, proof of understanding or evidence that an asset was physically received. Use explicit decisions and receipt actions for those outcomes.
Keep approval, assignment and fulfilment actions in their proper controls so their history is recorded. A comment saying “approved” is not a substitute for the approval action. When the requester needs to clarify something, use the corresponding workflow action and explain the information needed.
Before resolving, review outstanding requirements and record the solution. Verify any required user confirmation and asset receipt. During a pilot, sign in as the requester and technician separately to check what each can see and which action each is expected to take.
Search by reference, subject or requester. Verify its number and requester before opening it.
Check: You are not replying to a different ticket with a similar subject.
Check current stage, assigned technician and pending approver or employee receipt.
Check: You know whether the next action is a technical task, decision or requester response.
Open Conversation and review prior decisions and messages.
Check: System actions and user comments are distinguished; context is not repeated unnecessarily.
In Add follow-up, describe what was checked, the result and the specific next action. Avoid secrets.
Check: The reader can act without another vague request for an update.
Type @ and select a permitted suggestion where supported.
Check: The intended collaborator is actually selected. Mentioning someone does not transfer ticket ownership.
Use the attachment control or supported image paste and follow the format/size limits shown by the form. Review the preview.
Check: The attachment belongs to this ticket and does not expose unrelated private information.
Click Post message, wait and inspect the new timeline entry. If there is an error, inspect existing entries before retrying.
Check: The message appears once with the right author and content.
Click Seen checks/profile photos to open names and timestamps when viewing has been recorded.
Check: Read receipts indicate viewing, not approval, understanding or physical equipment receipt.
Perform approval, assignment, clarification or other permitted actions through their controls, with required reasons.
Check: A comment saying approved or closed is not being mistaken for a workflow transition.
Review outstanding requirements, record the solution and perform the permitted resolve/confirmation actions. Inspect the requester view.
Check: Required approvals and receipt are complete; the final history explains the outcome.
Read validation/errors and check access; avoid repeated clicks.
Select an eligible suggestion rather than typing a plain name.
Another authorized person must view the relevant content. Do not infer approval from a view.
Inspect outstanding approvals, fulfilment and receipt rather than issuing an unrelated asset.
Run the normal path and an exception with separate requester, approver and technician accounts. Compare the visible result with your written policy, and keep a record of the checks.
Explore the online demo, or evaluate for seven days on your own VMware, Hyper-V or Huawei infrastructure.
VPN & records / PRACTICAL GUIDE
Connect an account to its employee and approved request without putting credentials in conversations.
One Ticket Less product team · 12 operational steps · Detailed guideConnect an account to its employee and approved request without putting credentials in conversations. This walkthrough uses an illustrative company setup. Adapt the policy to your organization and validate it before rollout.
A VPN request is an access request, not a demand for a laptop. Configure the relevant service and approval policy, collect its business justification and verify the route with a sample request. Complete the approval before provisioning. Record the outcome through the supported VPN ticket process so the account has an employee and request reference.
The current VPN register is restricted to system administrators and requires a separate vault passphrase. The screenshot shows the locked entry screen, not an account list. Access is time-limited to five minutes and bound to the sign-in; impersonated sessions cannot open it. Five incorrect attempts pause unlocking for 15 minutes. Do not put the vault passphrase into a ticket or share it in a team conversation.
The designated custodian can import an existing account list during the initial import window. Check that usernames and employee associations are correct before finishing the import. Closing that window makes approved tickets the route for future provisioning. Use source filters to distinguish legacy entries from ticket-provisioned accounts.
Search using the exact VPN username or filter by account source. Open the associated request for its context. Credentials remain protected until deliberately revealed; reveal actions are audited. The ledger is for accountability, not for displaying passwords to everyone who can read a support ticket.
Disable the actual account on your VPN platform as part of offboarding, then record the outcome against the relevant work. Deleting an employee profile is not proof that gateway access has been revoked. Verify revocation with the platform responsible for enforcing access; the register itself is not a VPN gateway.
Keep the requester, business need, approval decision, provisioning outcome and account link together. Record relevant follow-up work without copying plaintext credentials into notes or attachments. Before rollout, test an authorized administrator, a technician and an impersonated session to confirm that ordinary ticket access does not grant vault access.
Sign in as the authorized administrator and choose VPN Register.
Check: An impersonated session cannot open the register.
On first use, enter at least 14 characters in Vault passphrase and repeat in Confirm passphrase. Click Set passphrase & unlock. If enrolled, enter the existing vault phrase and click Unlock register.
Check: Use the existing separate phrase if already enrolled in the IT Password Vault; the login password is not the vault phrase.
Use the unlocked register within five minutes. Click Lock register when finished.
Check: Five incorrect attempts pause unlocking for 15 minutes. An expired unlock requires unlocking again.
For existing accounts only, prepare CSV UTF-8 with employee_name,employee_no,username,password,notes headers. Employee number and notes are optional. Keep each batch within 100 rows and 1 MB.
Check: Required name, username and password values are present; temporary CSV is treated as sensitive plaintext.
Click Import existing VPN list, select the CSV and tick the existing-account confirmation. Click Import encrypted accounts.
Check: A duplicate username rejects the whole batch; do not assume partial import.
Choose Existing list under Source and click Filter. Check employee associations and exact usernames.
Check: All expected records are present; temporary files are handled according to company policy.
Only after reconciliation, click Finish initial import, tick the completeness confirmation and click Close initial import.
Check: This cannot be reopened from the portal. Future provisioning follows approved VPN tickets.
Use the configured VPN access service and complete approvals. Provision and submit the credentials using the authorized ticket process.
Check: The account is linked to the employee and request; no laptop is assigned just to complete VPN access.
Use Exact VPN username and Source, then Filter. Use Reset to clear filters; use Next page where present. Open the linked ticket for approval context.
Check: Exact spelling and source are correct; a missing first-page entry is not proof the account does not exist.
Click Reveal credentials. Review the private dialog only when needed; click Close and clear when finished.
Check: The reveal is audited. Values clear after one minute or when closed; never paste them into comments.
Disable access on the VPN platform, verify revocation, and record the outcome in the relevant work record.
Check: Deleting a profile or changing a ledger record is not gateway revocation.
After checking the import, remove plaintext CSV copies according to policy.
Check: Browser parsing does not delete copies on your computer, in email or in backups.
Check custodian rights and whether the initial window is closed.
Check UTF-8 headers, required columns, duplicates, row count and file size.
Clear filters, verify exact spelling and check pagination.
Respect the 15-minute pause. A normal login password reset does not disclose the vault phrase.
Run the normal path and an exception with separate requester, approver and technician accounts. Compare the visible result with your written policy, and keep a record of the checks.
Explore the online demo, or evaluate for seven days on your own VMware, Hyper-V or Huawei infrastructure.
ONE TICKET LESS
Track equipment, assigned users, locations and custody history alongside the IT requests that explain each handover.
Maintain an inventory of equipment and account records with the information relevant to each type. Track an asset’s location and distinguish available IT stock, employee-issued equipment and shared room or department custody. A named record is more useful than an inventory count without an accountable owner.
For an approved equipment request, identify the actual device and record its issue. Keep the request, recipient and asset record connected so a technician can see what was supplied. Configure new-hire requests with the information needed to prepare equipment before the employee starts.
For a replacement, record the old asset’s return reason and condition as well as the newly issued device. Faulty, dead or scrapped equipment should not appear as available stock. For resignation, confirm what physically returned and retain accountability for anything still outstanding.
Inventory and custody records describe what the company has and who holds it. An inventory entry alone does not provide live health data. Endpoint agents are not included in the customer appliance. Agree the supported integration scope during evaluation.
Start with a representative set of laptops, shared equipment and account records. Reconcile imported records, resolve duplicate identifiers and validate location names. Test issue, return and retirement with separate authorized users before migrating the rest of the inventory.
Explore the online demo, or evaluate for seven days on your own VMware, Hyper-V or Huawei infrastructure.
ONE TICKET LESS
Track problems, requests, approvals and follow-ups together, with a visible next step for employees and technicians.
One Ticket Less brings the requester, assigned technician, status, target and conversation into the same ticket. Employees can follow their requests while service teams filter the work they are authorized to handle. Approval information identifies whose decision is needed rather than leaving everyone to interpret a generic pending label.
An employee selects a configured service and completes its request form. The policy determines whether approval is required. The team receives the work, the technician investigates, and follow-ups stay with the request. Resolution and employee confirmation are recorded as distinct steps where the configured process requires them.
Record useful investigation notes, updates and attachments in the ticket. Collaborators can follow the work without losing earlier decisions. Read receipts indicate recorded viewing activity; they are not approval or confirmation that the issue has been solved.
Configure service targets and working calendars. Review overdue or unassigned requests and inspect the responsible stage before escalating. Technician performance and service reports help explain the work behind the numbers rather than relying on ticket counts alone.
Bring a real policy to a walkthrough: one normal request, one exception and one escalation. Review what employees see, what the approver can decide and how the technician completes the request. Check the available fields, permissions and reports before rolling the policy out to the whole company.
Explore the online demo, or evaluate for seven days on your own VMware, Hyper-V or Huawei infrastructure.
ONE TICKET LESS
Define request conditions, approval stages and technician assignment rules in the administration interface. Test a route before publishing it.
Workflow automation applies your configured rules to a request. The request’s service, location, purpose and supported form values can determine its approval route. Assignment rules then determine which team or eligible technician receives the work. This makes routine routing repeatable while retaining the decisions in the ticket history.
An additional laptop might require the employee’s department head followed by IT review. A replacement could ask for the current asset and its fault, then follow a different review. An upgrade may need a separate business justification. These are policy examples, not mandatory routes: administrators configure the available purposes and their conditions.
Configure additional, replacement and upgrade requests, then compare the preview with a pilot request using the same employee and form values.
A company can route Infrastructure work by round robin while leaving Applications work for manual assignment. Eligibility can take account of skills, availability and workload limits. Define what should happen when nobody qualifies, and keep unassigned work visible to a manager.
Test requests from multiple departments and locations, an unavailable approver, a rejected request and a request whose values do not match any specific rule. Confirm group-vote thresholds and who can decide. Use the simulator to inspect the route before you publish, then verify actual decisions with separate user accounts.
The workflow engine supports conditional, ordered approvals; it is not an unrestricted scripting or robotic-process-automation platform. Cyclic workflows, arbitrary executable scripts and automated financial postings are outside the documented scope. Existing tickets retain their captured workflow revision rather than being silently rewritten when a new policy is published.
Explore the online demo, or evaluate for seven days on your own VMware, Hyper-V or Huawei infrastructure.
ONE TICKET LESS
Connect IT requests, approvals, technicians and equipment in one workspace, with administration controls for your company’s service processes.
One Ticket Less is IT service management (ITSM) software from Cipherstacks. Employees raise problems, equipment requests and access requests. Approvers review the business need, technicians handle the work, and managers follow ownership and service targets. The ticket retains the conversation and the decisions that explain its progress.
Set up service locations, equipment types, request fields and service catalogues through administration. Infrastructure and Applications can have different request forms and different policies. A VPN request can follow an access-provisioning route without requiring a physical laptop handover.
Approval routes and technician assignment are separate decisions: who authorizes a request does not have to be the person who fulfils it. Follow the service catalogue setup guide.
A ticket can connect an employee to the equipment issued to them. Asset records track custody, location, handover and return history. Shared-room and department equipment can be recorded separately from personally assigned laptops. When someone leaves, IT records the actual return rather than treating account deletion as proof that equipment has been recovered.
Use service targets, calendars, ticket history and technician performance reports to review where requests wait and who completed the work. Review the metric definition before comparing teams: request volume, resolution time and employee confirmation describe different parts of service delivery.
Configure SLA targets and working calendars or review technician performance reporting.
Choose a hosted company workspace with separate data, or a customer-managed VMware appliance with PostgreSQL and signed-file licensing. Agree the server, domain, email setup, backup ownership and support arrangements during the installation discussion. One Ticket Less is a service-management product; it does not replace a VPN gateway or promise unrestricted automation of every business system.
Explore the online demo, or evaluate for seven days on your own VMware, Hyper-V or Huawei infrastructure.
DEPLOYMENT / OFFLINE EVALUATION
One Ticket Less connects IT tickets, configurable approvals, technician routing and asset custody. The on-premise appliance keeps the application and PostgreSQL database on the infrastructure your company operates.
Product information reviewed 6 November 2026 · Cipherstacks
Choose a VMware OVA, Hyper-V VHDX or Huawei x86 QCOW2 / VHD import candidate, with installation-bound signed licensing and a seven-day trial. VMware passed native ESXi 8.0.3 acceptance. Hyper-V and Huawei passed isolated boot and setup tests; native host import acceptance is pending. The request page shows exact package instructions and limitations.
Request a 7-day offline trial ↗Access your company’s portal in a browser. Tenant workspaces have separate databases and files. Agree access, service scope and support arrangements with the One Ticket Less team.
Open the online demo →Your IT team imports the VM, manages local networking and certificates, and owns backup and recovery operations. Signed-file licensing supports an installation without ongoing internet validation.
Provide your company, contact email, employee count and virtual platform. Do not include credentials or confidential records. The vendor reviews compatibility before approving delivery.
An approved request receives a private, expiring link. It supports resumable downloads. Compare the downloaded appliance’s SHA-256 checksum with the release supplied by the vendor.
Import the OVA into VMware / ESXi and select the appropriate VM network. Size CPU, memory and storage for your employee count, ticket volume, attachments and retention needs; agree these requirements during evaluation. Reserve a stable address before onboarding users.
Open the appliance address shown after boot. Use the one-time owner setup key from the VM console, then enter the company identity, initial site, administrator account and timezone. Protect and change setup credentials before shared use.
Export the installation request and supply it to the vendor. The vendor signs a licence for that installation and technician allowance. Import the returned licence under Administration → Licensing. An unrelated installation’s licence will not activate your VM.
Configure locations, departments, service catalogues, request forms, approval stages and assignment policies. Use separate employee, approver and technician accounts to test normal requests, replacement equipment, exceptions and recorded returns. Test backup and restoration before wider rollout.
The evaluation licence expires seven days after signing, with no grace period. Download access expires independently. A paid licence or technician-quota upgrade is issued for the same installation and imported through Administration → Licensing; no reinstall or internet activation is required.
Retain your company’s backup and export procedures. Licence restrictions are not a backup strategy. A fully offline VM controlled by a privileged host administrator cannot provide an absolute guarantee against snapshot rollback or software modification.
The appliance uses PostgreSQL and does not include endpoint agents. Your company manages the host, network access, HTTPS certificate, backups, retention and user access policies. Enable MFA according to your organisation’s policy and agree how updates will be transferred into an isolated network.
This page does not claim ISO certification, zero vulnerabilities or universal hypervisor compatibility. Ask for the release notes, known limitations and an environment-specific acceptance check before production use.
We can help you compare its request form, approval preview, assignment and completion steps with the policy your company actually uses.
Request offline trial ↗ Talk to salesExplore the online demo, or evaluate for seven days on your own VMware, Hyper-V or Huawei infrastructure.
ONE TICKET LESS
How this public product website handles enquiries and browsing information.
This notice covers the One Ticket Less marketing website, not a customer’s separately installed service-management system. The website presents product information, illustrative screenshots and a locally hosted product video.
The walkthrough form sends your name, work email, company and optional message to sales@oneticketless.com through our website’s hosting mail service. We use these details to respond to your enquiry and discuss the product. Short-lived session and request-limit records help protect the form from abuse; enquiry content is not stored in a website database. Do not include passwords, sensitive ticket records or confidential employee information.
The offline trial link takes you to the One Ticket Less portal. That form records your company, contact name, email, virtual platform, employee count and any optional message so our team can review and respond to the evaluation request. Do not include passwords or sensitive records. Contact sales@oneticketless.com for questions about that information.
The hosting provider may process ordinary server-access information such as IP address, requested URL and browser information to serve and protect the website. Google Analytics 4 is loaded only if you choose Allow analytics. It records page visits and successful walkthrough-request events; our tracking code does not send form field contents to Google. Advertising storage, Google signals and advertising personalisation are disabled. You can decline analytics or change your choice using Analytics settings in the footer. The preference is stored in your browser for up to six months; analytics cookies can last up to six months. Product images, fonts and the video are served from this website.
External sites, including Cipherstacks, have their own privacy practices. For questions about information supplied with an enquiry, contact sales@oneticketless.com.
Last updated: 10 November 2026.
The help assistant searches published answers in your browser. It does not send chat messages to an AI service or a live chat backend and does not persist the conversation. Email links open your mail app; you choose whether to send an enquiry. Do not enter passwords, setup keys or private customer records.
Explore the online demo, or evaluate for seven days on your own VMware, Hyper-V or Huawei infrastructure.
ONE TICKET LESS
See requests, conversations and equipment records connected in the One Ticket Less service desk.
The tour uses illustrative company records to show request ownership, ticket follow-ups and equipment custody.
Follow how a request connects its employee, technician and equipment. The request list gives a view of ownership and status. The ticket keeps the conversation and decisions together, while inventory records identify the assigned device and its custodian.
Explore the step-by-step guides for configuration details, or book a walkthrough using your own company policy.
Explore the online demo, or evaluate for seven days on your own VMware, Hyper-V or Huawei infrastructure.
CAREERS
Interested in working on One Ticket Less?
For career enquiries, introduce yourself and tell us about your skills and the work you would like to do.


