
Turn a written policy into conditions, named decisions and a route you can verify. This walkthrough uses an illustrative company setup. Adapt the policy to your organization and validate it before rollout.
Start with a policy people can explain
Imagine a company where Factory equipment requires department approval, while higher-value requests also need Finance. Before opening the editor, write down who requests, who benefits, which information changes the route and who can decide. Separate approval from assignment: authorizing a purchase is not the same as choosing the technician who fulfils it.
Prepare the information the rule needs
In Administration, configure the relevant locations, departments and services. In Form builder, add the fields the policy requires. For a spending threshold, use a required numeric field and retain its identifier for the condition. The amount is supplied by the requester; it is not an automatic purchasing calculation. Avoid optional fields for information that determines whether an approval is required.
Build the rule and its stages
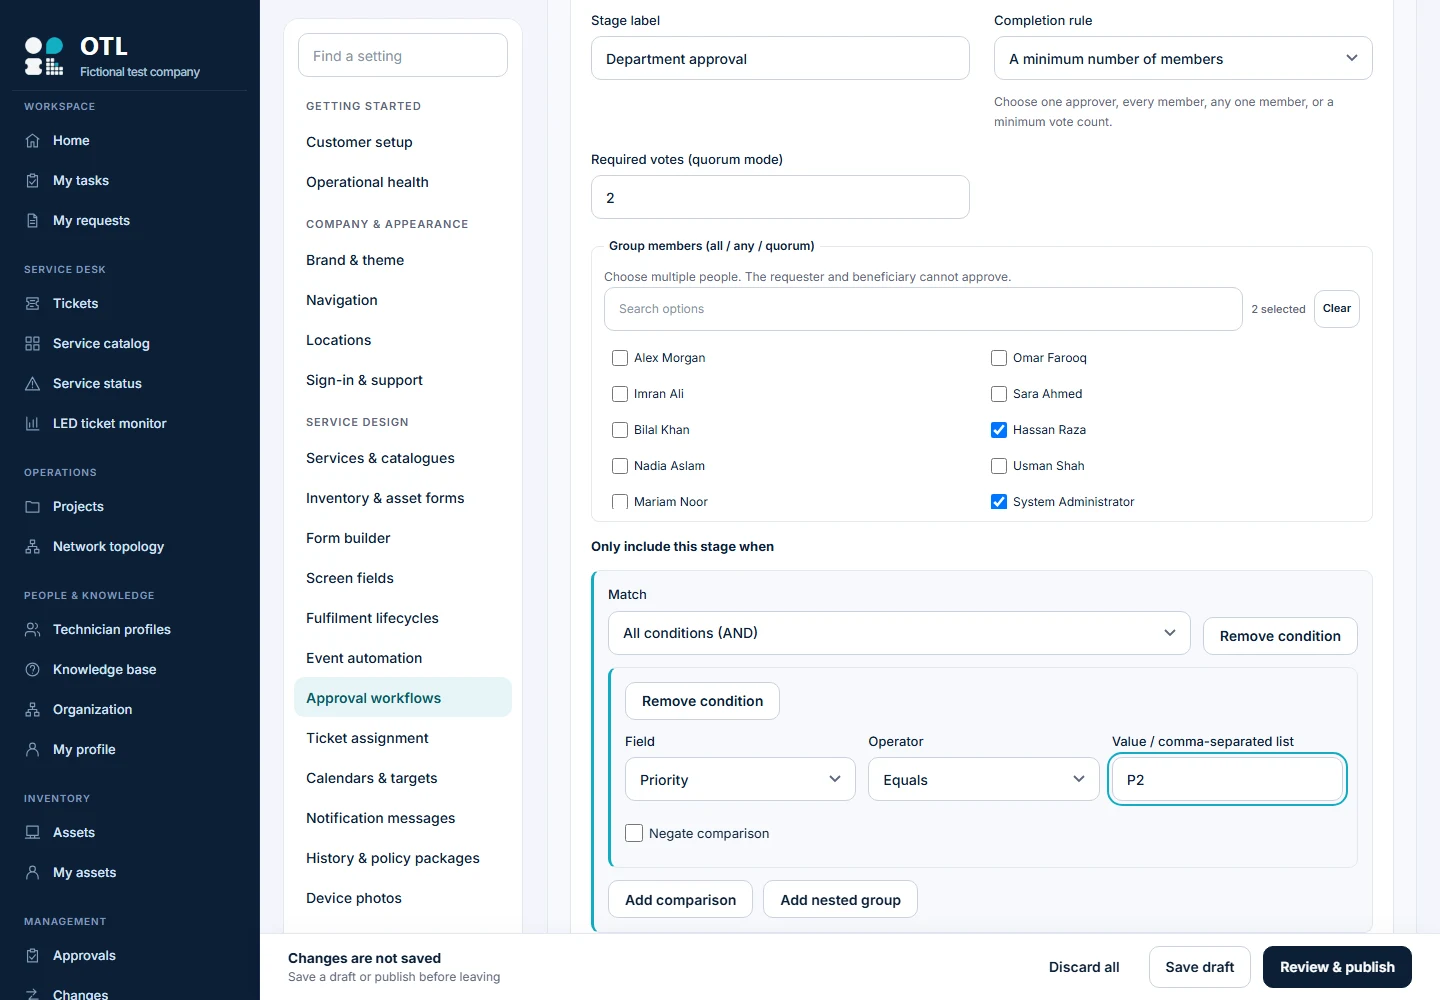
Open Approval workflows. Set the matching service, location or other supported selectors, then add ordered stages. Use a mapped manager, routing authority or named employee where appropriate. For group approval, choose all members, any one member or a quorum. Add stage conditions only when a stage should be skipped for some requests. The screenshot shows the group-member selector and conditional stage controls; its selected people and P2 condition are examples, not a recommended company policy.
Test the boundaries, not just the happy path
Simulate a normal request and a request from another location. For a threshold, test below, exactly at and above the boundary. Confirm the selected rule and each included or skipped stage. Also test a requester who is an approver: the requester and beneficiary cannot approve their own request. A rejection is a veto, not simply one negative vote to be outweighed.
Publish deliberately and verify a real request
Save the draft, review it, then publish the intended settings. Submit a pilot request using the same values as the simulation and compare the actual approval route. Existing requests retain their captured workflow revision; a new publication does not silently rewrite their decisions. Keep the pilot acceptance results with your rollout notes.
Know when a policy needs a separate design
The engine supports conditional, ordered approvals with bounded groups. It does not promise arbitrary cyclic processes, executable scripts or automated financial postings. Group membership is captured for the request; use supported dated delegation for cover rather than assuming a later team change rewrites an active group.
Follow the procedure, step by step
Create the rule
Click Add workflow. Enter Workflow name, select Request type, set Rule priority and review Enabled. Use a descriptive name such as Factory equipment approval.
Check: The rule is present as a draft; it is not yet the published policy.
Set the scope
Set For employee, For department, For category, For site, For request purpose and For equipment only where needed. Leave a selector at Any only when the rule should cover every value.
Check: Your sample request matches every selected restriction.
Build a condition
Under Run this rule when, click Add condition. Choose All conditions (AND) or Any condition (OR). Click Add comparison; choose Field and Operator, then enter Value / comma-separated list. Add nested group for grouped logic.
Check: AND requires every comparison; OR requires one. Negate comparison reverses a comparison.
Enter correctly typed values
Use a number for a numeric field, true or false for a checkbox, and comma-separated values for Is one of. Has a value tests presence. Create required custom numeric fields in Form builder before using a spending threshold.
Check: Test below, exactly at and above a threshold. A declared cost is not an automatic purchase-price calculation.
Add the first stage
Click Add approval stage. Enter Stage label. For Completion rule choose One designated authority, then choose Single authority source: mapped manager / HOD, routing authority or Named employee. Select Named single approver when using that source.
Check: The intended active person resolves for the sample requester.
Configure group voting
For a group, choose All selected members, Any one selected member or A minimum number of members. Select Group members and enter Required votes for quorum.
Check: The threshold is achievable. Requesters and beneficiaries cannot approve themselves; one person gets one vote per stage.
Order and condition later stages
Add further stages, use Move up or Move down, and configure Only include this stage when for optional decisions.
Check: Stages run in order. Conditional stages are included from the submission values, not arbitrary later decisions.
Configure escalation
Select Additional approver after deadline and set Elapsed hours after this stage becomes current.
Check: This adds an alternate; it never auto-approves or lowers the vote threshold. Time is elapsed, not business-calendar time.
Arrange planned cover
Open Manage dated authority delegation. Use Create dated delegation for the appropriate authority and dates. Review the confirmation before saving. Use Revoke delegation when cover must end early.
Check: Delegation is an immediate audited security action, not a configuration draft.
Copy to other asset types
Expand Copy this workflow to other equipment or catalogue options. Select Destination type, choose targets and click Create workflow copies. Review all inherited conditions.
Check: Copies are independent drafts; changing the original later will not synchronize them.
Simulate the route
Use Test a sample request, providing the requester, routing authority, equipment and relevant custom values. Click Run simulation.
Check: The selected rule, included stages and actual approvers match the written policy. No ticket is created.
Save and publish
Click Save draft for unfinished work. Use Review & publish when ready and review the proposed change before completing publication. Reopen the configuration.
Check: Saved values remain. An unsaved or saved draft alone does not activate the policy.
Verify actual decisions
Submit a pilot with the same values. Compare the preview and actual route. Sign in as distinct approvers; test approve, reject and clarification paths.
Check: Any rejection vetoes the request. Existing tickets retain their captured workflow revision.
Field reference and important rules
- Rule precedence
- Highest matching priority wins, then the most specific basic match, then stable rule ID.
- No match
- The service’s existing approval policy is used.
- Matching rule with zero stages
- Approval is explicitly bypassed. Do not accidentally publish an empty rule.
- Group limits
- Up to 25 named members per stage; up to 12 stages per rule in the documented engine.
- Unsupported processes
- Arbitrary cycles, executable scripts, automated financial postings and dynamic team quorum membership are not implemented.
If something does not work
Wrong rule wins
Compare priority, selectors and the actual request type/purpose. Test broad rules as well as the specific rule.
Approver missing
Check active accounts and manager/routing mappings. Do not select an unrelated person to hide a missing mapping.
Stage skipped
Compare its condition with the submitted snapshot, including numeric and checkbox values.
Existing ticket did not change
That is expected snapshot behavior. Use the supported revision/resubmission route when policy must change.
Before you roll it out
Run the normal path and an exception with separate requester, approver and technician accounts. Compare the visible result with your written policy, and keep a record of the checks.